

Pregnancy is a journey unlike any other. Things grow, stretch and otherwise evolve for a bunch of months in many previously unknown ways.
Despite buying new bras to accommodate my … bounty (ha ha), I’ve noticed that about halfway through my day, I am suffocating. The cups are great, no problem there. My band, however, goes from a pretty decent size in the morning to ribcage-strangulation-sized in the afternoon-to-evening. And so I came up with this cost-effective alternative to buying several sizes of bra:

You can buy bra extenders from Amazon, but I’m not willing to:
1) pay a lot of shipping for something I know I could be sent for a stamp; or
2) wait much longer. I can’t breathe!
Another downfall of buying: I’ve read in some reviews that sometimes the hooks are spaced too close together or far apart. You may not know if they’ll fit with your bra’s hook/eye spacing until your package arrives. Not something I’m willing to wait to find out.
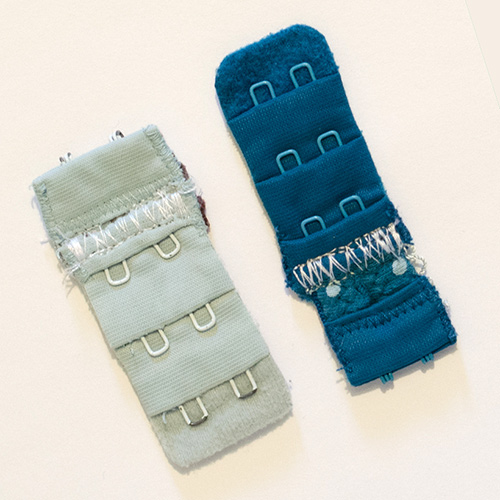
Thankfully I found two old bras with different hook/eye spacings that would fit with most of my newer bras nicely. They were worn out beyond repair and had holes in them. I’m actually not even sure why they hadn’t hit the garbage can yet. Good thing they didn’t — they have proved to be lung-savers.
This extension, for me, adds up to 3 inches to the band size. You’d think that’s a lot, but it’s really helped me to have some options.
Materials:
- Old bra(s) in colour(s) that will best match your new bras — or whatever you can find if you’re not wearing sheer shirts
- Rotary cutter OR scissors
- Thread (use coordinating colours if you are particular/going to wear sheer shirts)
- Sewing machine OR hands and a needle to sew with
Instructions:
IMPORTANT: Test to make sure the old bras you’re using have hook/eyes that are spaced the same width as your new bras whose cups fit. Otherwise, this project will be a waste of a crappy old bra.

Using a rotary cutter or scissors and your OLD bra, chop off the piece that has the ‘eyes’ right before the seam where the band and eyes meet. Be as dramatic as possible about doing this for your own entertainment.

I lined mine up to see how much of the band to leave on the ‘hook’ section of this project before cutting — about a half inch of band. Luckily, it was the perfect width for the next steps. (Don’t worry if yours isn’t — you can fix that as I’ll discuss later.)
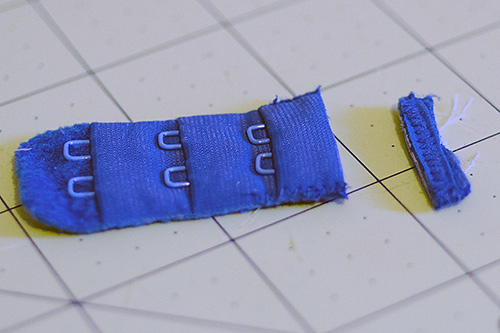
Carefully cut the seam off the ‘eyes’ piece, as close to the stitching as possible. This will leave a little gap on the end to insert the band of the ‘hooks’ piece before sewing.
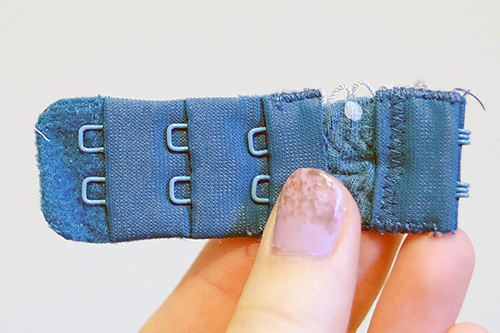
Front view: Inserted band into little gap provided by removing seam from ‘eyes’ piece. try to keep this as straight as you can, and insert band as far as it will go without bunching.
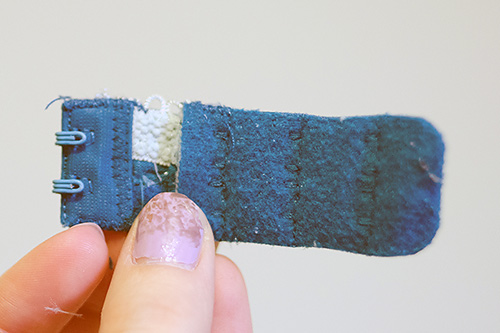
Back view of the above.

If you have room, pin the two pieces together. I am paranoid of breaking a needle at the moment, so I just made sure the band was in there as straight as possible and paid close attention. (PS, I am using a heavier needle for this, but if you go slowly, you can use a standard weight one.) Zig-zag stitch, making sure to tack both ends. If you hand-sew, use a similar kind of stitch. A straight stitch may not be sturdy enough for some ladies’ … uh, parts.

There it is, a work of art. (Uh, I stitched over it twice, because I’m not trusting enough of my seams yet. That’s why my stitches look so great…) Trim excess thread. Attach to any of your bras that have the same vertical spacing for hooks as these eyes, and BREATHE again. Ahhhhhhh!
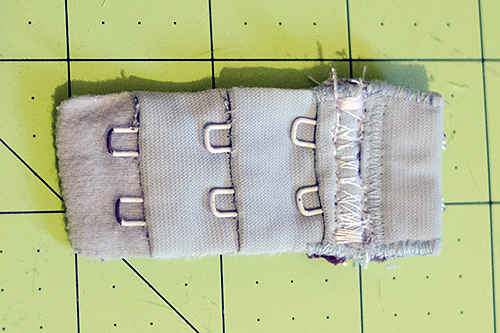
Here’s another I made. This is what I mean by different vertical spacing between hooks. Some of my new bras would not have attached right to the first DIY extender, so this one helps to close the gap… heh heh heh.
Note: The second extender’s band was a bit wider than the hole made by cutting off the seam at the end of the ‘eyes’ piece. This is easily fixed. I didn’t want to chop off any of the elastic that’s at the top and bottom of the band, so I kind of just crammed it in. If it’s really wide, you could fold/crease the middle of the band and use a quick stitch to make the band narrower. Think outside the box! Again, please disregard my awesome stitching. When there’s no room to stick a pin in material, your consistency is bound to be affected.
So there you have it! I put my old crappy bras on the line — and online — to hopefully save someone’s life or wallet from buying 7 different sized bras that will fit at any point during the day.
Hope this tutorial helped! What do you think?


Pingback: 34 weeks: Back to mother-blogging | commatose.ca
This is a briljant solution!
Why didnt i think of this??
Glad you like it! I had no choice but to come up with something, and since it was a long, snowy winter I didn’t feel like driving to the sewing stores to look for ones that may or may not clip onto my bras. 🙂 Thanks for the comment.
This sounds like the answet to “no more strangulation”! Thanks Nik….
I hope it brings you many full breaths. It sure helped me! Thanks for stopping by, Anni!
Only problem with this is now the straps r in the wrong spot and keep falling down. At least that is what happens with mine.
Oh dang. Mine were okay but I do have broader shoulders.
Thank you so much, was struggling with ideas as to how to do this!
You’re very welcome! Hope it helps.